
I spent just over 5 hours last week learning how to make and decorate cupcakes!
When my friend Sarah found out that
The Bonnie Gordon School of Cake Design offered a "
Designer Cupcake Workshop," Sarah, and a bunch of my other girlfriends knew that this would be the perfect birthday present for me!

As soon as I got there, I took a self-guided tour!
It was neat to see all of the industrial sized baking equipment and cake trays.
 DAY 1 - Baking
Isabelle Loiacono instructed our small group of six. On the first day, we made two different kinds of cupcakes. Three of us made Chocolate filled Cappuccino cupcakes while the others made Dulce
De Leche filled Apple Spice Cupcakes. In fact, the Apple Spice recipe also called for walnuts, but everyone was very understanding of my nut allergy, so the nuts were omitted.
Below are most of the ingredients for the
cappuccino cupcakes. You'll have to attend the course to receive the
recipes!

I learnt a new way of filling
muffin tins! While I usually pour all of the batter into the muffin tins from a large measuring cup, Isabelle likes to put all of the batter into a large piping bag and pipe the batter into the tins. Sabrina (another woman who I met while taking the course) suggested that she likes to use an ice cream scoop which helps her add the same amount of batter to each tin. Choose the method that works best for you!

After the batter was added, only the finest,
LINDT Swiss premium chocolate was added to the middle of the cupcake before baking.
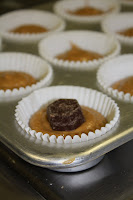


This created the oozing chocolate effect when the
Cappuccino cupcakes came out of the oven!
Just look at that delicious melted chocolate!
Don't you just want to take a bite?

Using a piping bag, dulce de leche was added to the Apple Spice Cupcakes. A little sweet for me...but, if you have a sweet tooth...boy are you in for a treat!

The baking part was fun and I did learn many tips.
Some of them include:
The lighter color the bakeware, the better
Bake with ingredients at room temperature
When mixing in flour using a stand mixer, always mix at the lowest speed. This creates a fluffier cake.
If baking using a convection oven, decrease the temperature by 25 degrees and reduce baking time by approximately 5 minutes
Day 2 - Decorating (My Favourite!)
This was the day of the course that I was looking forward to the most! I had never taken any cake or cupcake decorating courses before so I was really excited to learn some new ways of making the cupcakes look beautiful. It really is an art form!
When I arrived, written on a white board were all of the different types of cupcakes we would be learning how to decorate.

The best part was that we had all of the possible tips, coloured icings and supplies right there in front of us...many of which I had never used or known how to properly use before.

Isabelle did a demonstration of each cupcake. I tried to follow along!
Sunflower Cupcake
Use tip #366 (large leaf tip)
Leaf tip forms the shape of a leaf. Start at the outer edge of the cupcake and pull away to form the leaf. Repeat around the entire outer edge of the cupcake. Continue to form another layer in between each set of leaves to form two circles of leaves. Fill the centre of the sunflower with melted M
erckens chocolate. (This is the same chocolate that I use to make the chocolate coating for the cheesecake pops!) Sprinkle immediately with white round sprinkles if desired.


 Flower Cupcake with Swirl Icing
Use tip #126 (large petal tip)
To create the swirl: I often just fill a piping bag with two colours. On the left side of the bag, I would add purple for example, and on the right side, I would add the other colour like pink. The result, a nice swirl. However, I learned a new technique from Isabelle where the inside of a piping bag is lined with one colour. I think it should be the darker color. So imagine that you will draw vertical lines on the inside of the bag with one color and then fill the bag with the other colour.
To create the flower: Use the petal tip with the smaller part at the top. The larger part should be at the base of the flower. Start almost levelled at first and make your way around the outer part of the cupcake. On the second layer, angle the piping bag at about a 45 degree angle and continue until the flower is complete. Use the Swirl tip # 804 to add a dab to the middle of the flower. (This was a hard one for me! But with practice, I might eventually improve!)

Ladybug Cupcake
This one was my absolute favourite! So adorable and so easy to make. Dip your cupcake into chocolate
ganache and dip just over half of the cupcake into round red sprinkles. Use
melted M
erckens chocolate to add dots and add silver
dragees (silver candy balls) as eyes. On a piece of parchment paper, draw out the "ears" and let set in the fridge for about 10-20 minutes. With a toothpick, create two holes for the ears toward the front of the cupcake without any sprinkles. Detach chocolate ears from parchment paper and stick into holes. The result...an adorable ladybug cupcake!


I love it!!!!
So simple and so adorable! I am also going to try to replace the fancy
ganache with chocolate icing. I'm sure the ladybugs would look just as cute!
Here are some of the beautiful flowers we learned how to create using fondant!
Mine is the one with the yellow base. Not bad for a rookie!

Here we are....
focused and hard at work!

It is also such a great treat when someone else is cleaning up after your mess.

It was time to pack up the cupcakes. To ensure that cupcakes would not move during delivery, I learned to drop a small dab of icing under each one. This acted as a glue and secured each one to the box.

Thanks to my wonderful girlfriends Sarah, Julia, Joelle, Sherri, Lauren, Jen, Adrienne and Clare for such a thoughtful and useful birthday present. I love you girls and I will definitely be making some for you to eat the next time you all come over!
 Yay! I got my first order! My friend Mary ordered personalized cookies for her daughter Zoe's 7th birthday! Knowing that I am allergic to nuts and that all of my baking is nut free, Mary knew that individually wrapped cookies would be a "sweet treat" for Zoe to bring to school to help celebrate her birthday with her classmates.
.JPG)
.JPG)
 Happy Birthday Zoe!
 All packed up and ready to go!
.JPG)
.JPG)


.JPG)
.JPG)


.JPG)
.JPG)


