Search This Blog

Thursday, December 17, 2009

Chanukah Cookies

Part 1
I love finding cookie cutters for different holidays! Here is my latest holiday creation...some Chanukah Gingerbread cookies...Happy Chanukah!

Follow the recipe for making gingerbread cookies or sugar cookies and let cool before icing and decorating.

 
Even Lucas wanted to eat his own cookie!
"Mommy, this cookie is yummy!"

Part 2
At the beginning of the week, my student Rebecca's
mom came to school to deliver a special gift. 

To my surprise, she brought me freshly baked and decorated Chanukah Sugar Cookies! Boy do my students know me well.  Between shoes and baking, these kids have got me all figured out!

What a fantastic surprise! 
Aren't these cookies just gorgeous? 

 They are just a little bit nicer than mine!

And...they tasted even better than they looked!
Oh oh!  There I go...eating away.
Love the buttery taste.  It is so sinful, yet so delicious!
and...gone!

As a gift with these delicious cookies, I also received The Cookie and Biscuit Bible.
I will most definitely be trying some of the new recipes over the holidays!

Happy baking!

Sunday, December 13, 2009

Potato Latkes

December is such a great time of year.  There are so many festivals of light that almost always involve food!  Some of the traditional foods eaten on Hanukkah include eating foods fried in oil, such as potato latkes or potato pancakes. This morning before our Hanukkah party, I referred to my newly owned copy of Second Helpings by Noreen Gilletz.  My girlfriend Julia bought it for me as soon as I got engaged.  Thanks mom, but, I don't need to borrow yours anymore!

For each batch of latkes, (yield about 2 dozen) peel and grate 6 potatoes.
Be sure to drain out all of the excess liquid.
As you can see below, after grating, a lot of liquid is produced.


Pour out the liquid and add remaining ingredients. I also like to add 1 tsp. of Chicken flavoured Osem Soup and Seasoning Mix. It adds even more flavour to each latke. Remember, even after mixing all ingredients together, the less liquid, the crispier the latke!

I used the same recipe to make sweet potato latkes.  I quickly realized that the sweet potato latkes didn't stick together as well as the regular ones.  Julia reminded me that sweet potatoes don't have as much starch as regular potatoes...ooops!  Next time I will have to combine more white potatoes with less sweet potatoes so that the sweet potato latkes stick together a bit better than they did today! Nevertheless, they tasted delicious!

The unhealthy but mouth watering method:  Drop from a spoon into hot oil, turning only once. 

The healthier, less sinful method:  Brush only 1 tsp of oil onto the pan and let fry.  Turn once browned.
Alternately, baking latkes is just as delicious.  Place latkes on an aluminum foil covered baking sheet brushed with 1 tsp. of oil.  Bake at 450 degrees for 10 minutes on each side. 
Before serving, place finished latkes on paper towel to drain.
Mmmm...
Before eating, Hanukkah candles are lit to commemorate the miracle of the Maccabees' victory and the miracle of the oil that burnt for eight days in the Temple.  Since today is the third day of Hanukkah, three candles are lit using the Shamash (the helper candle), starting from the far right of the Hanukkiah. Each day, another candle is added and is lit.
Serve potato latkes with apple sauce, sour cream and sugar.
Enjoy!

Tuesday, December 8, 2009

Gingerbread Cookies


My girlfriend Joelle loves Gingerbread Cookies. So, upon her request, I attempted to be festive and bake some holiday cheer into this week’s posting! Thanks again to my favourite ladies, Valerie Peterson and Janice Fryer author's of Cookie Craft for yet another delicious recipe!

Here are the ingredients that you will need to bake these cookies:

5 cups all-purpose flour
2 teaspoons ground ginger
1 teaspoon ground cinnamon
1 teaspoon ground cloves
1/2 teaspoon baking soda
1/2 teaspoon salt
1 cup (2 sticks) unsalted butter, softened
1 cup granulated sugar
1 large egg
1 cup molasses

Whisk together the flour, ginger, cinnamon,
cloves, baking soda, and salt. Set aside.


Using the paddle attachment, cream together the butter and sugar until the mixture is light and fluffy.
Add the egg and molasses and mix until well blended. With the mixer on low, gradually add the flour mixture
to the butter mixture.


Follow the same method for rolling out dough as you would use for rolling sugar cookies.
Cut away with your favourite cookie cutters!
 
Bake in the middle rack of the oven at 350 degrees for 12-16
minutes and enjoy the wonderful aroma in the kitchen!
Let cool completely on cooling rack before decorating.

Before decorating, be sure to plan out your design!
However, I can't take credit for the ideas below. I searched online for images of gingerbread cookies and came across an amazing blog called Mad Baker.  Of all of the images that I looked up, it was her post from December 2007 that I loved most, Mad about Gingerbread Cookies.


Then, I created some original designs of my own!
Enjoy!

Sunday, November 22, 2009

Tiramisu


I was talking to my mom about what to make for this week's post and she suggested her that her friend Mira brought leftover Tiramisu into work.  She told me how delicious it was...so here it is...Mira's Tiramisu for you all to enjoy. Thanks for sharing your recipe Mira!

What you will need for this recipe:
-1 tub 454 g of ricotta (light)
-500 mL Nutriwhip Light
-42 Italian lady fingers
-2 cups strong coffee (cooled)
-2 tbsp Kahlua (I added a bit more!)
-cocoa powder
-cinnamon (optional)
 
With the whisk attachment, first, beat the Nutriwhip on low speed to avoid splashing. Slowly increase to high speed until peaks form. Gently fold in tub of ricotta. Set aside.

Next, pour 2 cups of cooled, strong coffee into a shallow bowl.  Add 2 tbsp of kahlua and mix.  Dip both sides of each lady finger in coffee mixture.  Doing this quickly avoids soaking up too much liquid and keeps each lady finger in one piece.  Repeat this step for remaining 20 lady fingers.


In a 9" x 13" inch pyrex dish, line up lady fingers, sugar side up, in 3 rows of 7.


Spread a thick layer (half of ricotta mixture) over lady fingers.  Repeat soaking and lining up for reamining 21 lady figures. Spread a thin layer of ricotta mixture over second layer. For a pretty finish, fill piping bag with ricotta mixture. 

Use Wilton star tip #1M and pipe remaining mixture in waves over top. 
Sprinkle with cocoa powder and add a pinch of cinnamon if desired.
Cover with saran and let set in fridge overnight.
Then bring over to a friend's house for dessert!

Even Ryan and his adorable little nose wanted to try some...


Thanks mommy, but I think I can do it all by myself!


Yummy!
Enjoy.

Saturday, November 14, 2009

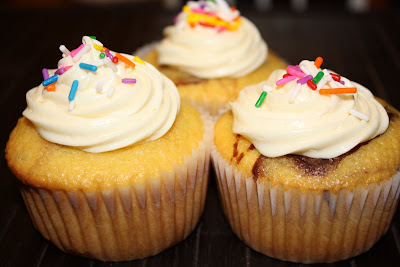
Marble Cupcakes

I love my brand new cooling rack.  It is double the size of the one I already own, and therefore, holds double the amount of baked goods!

Marble Cupcakes

Taken from Martha Stewart's CUPCAKES (pg. 90)


YIELD: 16 cupcakes

1 ¾ cups cake flour sifted
2 teaspoons baking powder
1/2 tsp salt
1/3 cup milk, room temperature
1/3 cup heavy cream, room temperature
1/2 cup (1 stick) unsalted butter at room temperature
1 cup granulated sugar
3 large eggs, room temperature
1 teaspoon pure vanilla extract
1/3 cup unsweetened dutch process cocoa powder
1/4 cup boiling water

1. Preheat oven to 350ºF. Line muffin tins with paper liners. Sift together cake flour, baking powder and salt. Combine milk and cream.
2. With an electric mixer on medium-high speed, cream butter and sugar until pale and fluffy. Add eggs, one at a time, beating until each is incorporated, scraping down sides of bowl as needed. Beat in vanilla. Add flour mixture in three batches, alternating with two additions of milk mixture, until just combined.

3. To make chocolate batter, measure out one cup of batter, and transfer to another bowl. Combine cocoa and the boiling water in a bowl. Stir into reserved one cup batter.

4. Fill prepared cups with vanilla batter just over half way and add chocolate batter, filling each tin about ¾ full. Run knife or wooden skewer through batter in a figure-eight motion to make swirls.

5. Bake, rotating tins half way through, until tops are golden brown and a toothpick inserted into centers comes out clean, about 20 minutes.

6. Transfer to wire racks to cool completely before serving.
  Mmmmm....they smell delicious! 
Here's to you chocolate lovers....

And...as Anna Olsen used to do on every episode of SUGAR...
Time for the switch up!

How about a marble cupcake with fresh raspberry buttercream icing garnished with a fresh raspberry?


Or, a marble cupcake topped with vanilla buttercream icing, garnished with a Jelly Belly?
Or...better yet, some Skittles?

Personally, I prefer a little less icing with some good old fashioned sprinkles...
and more sprinkles!
But others prefer simplicity...
Enjoy!

A few weeks ago, I attended a Cupcake Class where Pastry Chef Melissa Abbou shared some delicious recipes for buttercream icing.

Vanilla Buttercream Icing
3/4 cup unsalted butter (room temperature)
4 cups icing sugar
1/3 cup milk
2 tsp vanilla


Cream butter scraping down sides of bowl. At slow speed, alternate adding icing sugar and milk. Add vanilla and the last bit of icing sugar. Whip together. If wanting to color the icing, or add raspberries, add now.
*For dairy allergies, soy milk can be substituted for milk, and margarine for butter.

Don't worry...I didn't forget about you chocolate lovers!

Chocolate Buttercream Icing
3/4 cup unsalted butter (room temperature)
2 1/2 cups icing sugar
1 1/2 cups cocoa powder
1/3 cup milk

Follow same steps as above. Enjoy!