Search This Blog

Friday, January 28, 2011

Valentine's Day Cake Pops

It's time to start thinking about Valentine's Day!  To give you some ideas, I will be posting a few Valentine's Day recipes over the next few weeks!

"Happy Valentine's Day sweetie, from one heart cake pop to another!"

Pictured above are most of the materials you will need to make these pops.

Materials you will need:
20 uncoated cake balls
wax paper
baking sheet
1 pound red chocolate candy coating
Deep, microwave-safe plastic bowl
20 lollipop sticks
40 white heart sprinkles
6-12 pink heart sprinkles (optional)
Styrofoam block
Black edible-ink pen 

For basic cake pop instructions click here.
I used these jumbo heart sprinkles that can be found almost anywhere around Valentine's Day.  I used the white hearts for the eyes and the pink hearts to make the bows.

I used the larger heart shaped cookie cutter as a guide to frame the heart pop.  The heart was not quite as big as the large cutter but not as small as the small cutter. To form the heart, I rolled out a regular ball and flattened it slightly. I then used the top part of the cookie cutter to shape the top of it and the bottom of the cutter to shape the bottom. 

Here's what they looked like pre-dipped. I used a vanilla cake and my own chocolate butter cream icing for these pops. After they set in the freezer for about 20 minutes, I dipped each lollipop stick into the red candy melts and inserted a stick about half way into each one.

I transferred the melted candy coating into a smaller narrower container.

Which made it easy to dip...

And remove!

After a little tap, tap, tap, I immediately adhered the heart eyes to the pops. Once they dried, I used my edible ink pen to add all of the details: the eyelashes, eyebrows and smiles.

All of the pops rested in a styrofoam block to continue drying before being packaged.

How cute...a family of heart cake pops!

All packed up and ready to be delivered! 
Happy Valentine's Day!

Sunday, January 23, 2011

Ryan has a Sister!

Yay! Our cutie petutie Ring Bearer Ryan has a little sister! I was so excited when I heard the great news that I began to bake and decorate as soon as we found out the baby was a girl. I was inspired to try out this adorable footprint idea by Callye from The Adventures of Sweet SugarBelle. I only recently discovered her fantastic cookie blog and immediately added it to my favourites!

I added the zest of one lemon to my sugar cookie recipe. (So, all of those marks you see in the dough above are lemon zest...not dirt!)

I bought the cutest mini baby cookie cutters a few weeks ago!  Surprisingly, I found them at a dollar store near my house.  It is hard to see how small they really are in the picture above, but by looking at the picture below, the size is easier to gage.

The mini bottles and onesies would make such cute cupcake toppers.  (But I'll save that idea for a future post!)

Here's the step-by-step of how I made the footprint cookie. First, I piped the border. Next, I flooded it with lemon flavoured royal icing and let it dry overnight. I wanted to compliment the flavour of the cookie so I made lemon royal icing this time. Finally, I piped the footprint and then piped Maryn's name on the right side.

Are these not adorable?

I tried to tie in brown royal icing wherever possible.  I love the combo of pink, white and brown! It reminds me of the cookie seating cards I made for my wedding!

Sugar Cookies with a Twist of Lemon
(Adapted from Cookie Craft)

3 cups all purpose flour
1/2 teaspoon salt
1 cup (2 sticks) unsalted butter, softened
1 cup sugar
1 large egg
1 teaspoon vanilla 
zest of 1 lemon

Directions:
1. Whisk together the flour and salt in a medium bowl.
2. Using your mixer, use the paddle attachment to cream together the butter and sugar until the mixture is light and fluffy. Add the egg and vanilla and lemon zest and mix until well blended.
3. With the mixer on low, gradually add the flour mixture to the butter mixture until the two are thoroughly blended.
4. Turn out dough onto work surface and divide into two or three equal portions. Form each one into a rough disk. Click here for step by step and visuals of how to roll out dough and attain cookies of the same thickness.
6. Preheat oven to 350 degrees.
7. After you have rolled and cut the dough and the cookie shapes are on parchment-lined cookie sheets, bake them in the middle rack of the oven for 12-16 minutes or until the cookies start to turn slightly golden around the edges. (The mini bottles and onesies were baked for about 8 minutes.)
8. Cool cookies completely on a rack before icing or decorating.
Yield
2 1/2-inch cookies--about 30
3 1/2-inch cookies--about 16
4 1/2-inch cookies--about 12

Royal Icing with a Twist of Lemon
(Adapted from Cookie Craft)

4 cups (1 pound) icing sugar
3 tablespoons meringue powder
7 tablespoons warm water
2 tablespoons freshly squeezed lemon juice

Directions:
In mixer bowl, pour in the warm water and the meringue powder. Mix it with a whisk by hand until it is frothy and thickened…about 30 seconds. Add the lemon juice and mix for 30 seconds more. Pour in all the icing sugar at once and place the bowl on the mixer. Using the paddle attachment on the LOWEST speed, mix slowly for a full 10 minutes. Icing will get thick and creamy. Cover the bowl with a dampened tea-towel to prevent crusting and drying. Tint with food colourings or thin the icing with small amounts of warm water to reach the desired consistency.

All packed up and ready to be delivered to Maryn's mommy and daddy.

Sunday, January 16, 2011

Ghirardelli Chocolate Waffles

Mmmm...CHOCOLATE!

I am not really such a huge chocolate fan. But let me tell you...these waffles are good!

Sift the dry ingredients...

Then combine with the wet ingredients. Ladle about a cup of the batter onto a pre heated waffle maker and spread the batter using an offset spatula. Close the lid and let the steam fill your senses with the delicious scent of fresh chocolate! Repeat with the remaining batter.

Here is what the final product looks like.

I think I want one now.

Lucas loved the waffles. Could you tell? He had the melted chocolate chips all over his face! Too cute!


Ghirardelli Chocolate Waffles
(Taken form the Ghirardelli Website)
Yield: 6 servings

1 1/2 cups Semi-Sweet Chocolate Chips
1 cup Unsweetened Cocoa
2 cups all-purpose flour
1 tablespoon baking powder
2 tablespoons granulated white sugar
1/2 teaspoon salt
4 large eggs, separated
4 tablespoons canola oil
2 cups whole milk

Directions
Preheat waffle iron. Sift the flour, cocoa, and baking powder into a bowl. Add the sugar and salt and whisk to thoroughly mix. In another bowl, whisk together the milk, egg yolks, and oil. Add to the flour and whisk gently until just combined.

In clean, dry bowl, beat the egg whites with an electric beater at medium speed until they form soft peaks. Fold into the batter and mix in the chocolate chips.

Ladle one-third of the batter onto the center of the waffle iron. Close the top and cook until the waffle is crispy on both sides. About 2-3 minutes. 

Drizzle with syrup if desired. Serve immediately.

This how I plated them for brunch.
Enjoy!

Sunday, January 9, 2011

Cupcakes for RBC

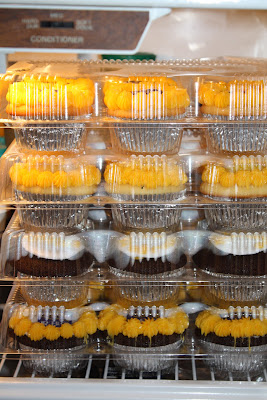
Rich works for RBC. To kick off a Project, the company ordered some cupcakes with edible images of their logo.

The images were e-mailed to my friend Joy of Baked with Joy. She has a special printer that uses food colouring instead of ink to create images on edible paper. I am so excited...Rich just surprised me with a printer for this purpose. I can't wait to use it. I will now be able to print my own edible images!

For this project, I used scissors to cut out the images. But since then, I watched Ace of Cakes where I saw someone using a pizza cutter to cut out the images. I'll definitely try that next time.

Once the cupcakes fully cooled, I spread vanilla frosting on the first cupcake.

Next, I very gently placed the image on top of the frosting. The frosting is the glue that adheres the image to the cupcake.

After that, I used a star tip to pipe a golden yellow frosting border around the image.

The border hides all of the original frosting as well as the edges of the image.

I also made some white sugar circles out of royal icing and piped some of the project names on other cupcakes.


All done!

Chillin' in the fridge ready for delivery.
Thanks RBC.

Sunday, January 2, 2011

Shortbread Cookies

Flaky, buttery, crumbly, classic shortbread.

Classic Shortbread

2 cups all purpose flour
1 1/4 teaspoons coarse salt
1 cup (2 sticks) unsalted butter room temperature, plus more for pan
3/4 cup confectioners' sugar

1. Sift together flour and salt into a bowl. Put butter into the bowl of an electric mixer with the paddle attachment. Mix on medium-high speed until fluffy, 3 to 5 minutes, scraping down sides of bowl. Gradually add confectioners' sugar; beat until pale and fluffy, about 2 minutes. Reduce speed to low. Add flour mixture all at once; mix until just combined.

2. Preheat oven to 300 degrees F, with rack in upper third.

3. Butter a 10-inch fluted tart pan. (The recipe suggests using a pan with a removable bottom. I did not have one and the recipe worked out fine.)

4. Using plastic wrap, press dough into the pan, making sure to press against edges. With plastic on dough, refrigerate for 20 minutes.

5. Remove plastic wrap. Cut out a round from the center using a 2 1/4-inch cookie cutter; discard. Using a wooden skewer, prick all over at 1/4 inch intervals. Put cutter back in center. Using a paring knife, cut dough into eight wedges. (I cut it into ten wedges.)

This is what it should look like before baking it in the oven.

6. Bake until golden brown and firm in the center, about 1 hour. Recut shortbread into wedges; let cool completely in pan.

Cookies can be stored in an airtight container at room temperature for up to 2 weeks.

Or, they can be combined with some chocolate shortbread stars and be plated and packaged to give to friends for the new year.

Happy New Year!