Search This Blog

Sunday, November 22, 2009

Tiramisu


I was talking to my mom about what to make for this week's post and she suggested her that her friend Mira brought leftover Tiramisu into work.  She told me how delicious it was...so here it is...Mira's Tiramisu for you all to enjoy. Thanks for sharing your recipe Mira!

What you will need for this recipe:
-1 tub 454 g of ricotta (light)
-500 mL Nutriwhip Light
-42 Italian lady fingers
-2 cups strong coffee (cooled)
-2 tbsp Kahlua (I added a bit more!)
-cocoa powder
-cinnamon (optional)
 
With the whisk attachment, first, beat the Nutriwhip on low speed to avoid splashing. Slowly increase to high speed until peaks form. Gently fold in tub of ricotta. Set aside.

Next, pour 2 cups of cooled, strong coffee into a shallow bowl.  Add 2 tbsp of kahlua and mix.  Dip both sides of each lady finger in coffee mixture.  Doing this quickly avoids soaking up too much liquid and keeps each lady finger in one piece.  Repeat this step for remaining 20 lady fingers.


In a 9" x 13" inch pyrex dish, line up lady fingers, sugar side up, in 3 rows of 7.


Spread a thick layer (half of ricotta mixture) over lady fingers.  Repeat soaking and lining up for reamining 21 lady figures. Spread a thin layer of ricotta mixture over second layer. For a pretty finish, fill piping bag with ricotta mixture. 

Use Wilton star tip #1M and pipe remaining mixture in waves over top. 
Sprinkle with cocoa powder and add a pinch of cinnamon if desired.
Cover with saran and let set in fridge overnight.
Then bring over to a friend's house for dessert!

Even Ryan and his adorable little nose wanted to try some...


Thanks mommy, but I think I can do it all by myself!


Yummy!
Enjoy.

Saturday, November 14, 2009

Marble Cupcakes

I love my brand new cooling rack.  It is double the size of the one I already own, and therefore, holds double the amount of baked goods!

Marble Cupcakes

Taken from Martha Stewart's CUPCAKES (pg. 90)


YIELD: 16 cupcakes

1 ¾ cups cake flour sifted
2 teaspoons baking powder
1/2 tsp salt
1/3 cup milk, room temperature
1/3 cup heavy cream, room temperature
1/2 cup (1 stick) unsalted butter at room temperature
1 cup granulated sugar
3 large eggs, room temperature
1 teaspoon pure vanilla extract
1/3 cup unsweetened dutch process cocoa powder
1/4 cup boiling water

1. Preheat oven to 350ºF. Line muffin tins with paper liners. Sift together cake flour, baking powder and salt. Combine milk and cream.
2. With an electric mixer on medium-high speed, cream butter and sugar until pale and fluffy. Add eggs, one at a time, beating until each is incorporated, scraping down sides of bowl as needed. Beat in vanilla. Add flour mixture in three batches, alternating with two additions of milk mixture, until just combined.

3. To make chocolate batter, measure out one cup of batter, and transfer to another bowl. Combine cocoa and the boiling water in a bowl. Stir into reserved one cup batter.

4. Fill prepared cups with vanilla batter just over half way and add chocolate batter, filling each tin about ¾ full. Run knife or wooden skewer through batter in a figure-eight motion to make swirls.

5. Bake, rotating tins half way through, until tops are golden brown and a toothpick inserted into centers comes out clean, about 20 minutes.

6. Transfer to wire racks to cool completely before serving.
  Mmmmm....they smell delicious! 
Here's to you chocolate lovers....

And...as Anna Olsen used to do on every episode of SUGAR...
Time for the switch up!

How about a marble cupcake with fresh raspberry buttercream icing garnished with a fresh raspberry?


Or, a marble cupcake topped with vanilla buttercream icing, garnished with a Jelly Belly?
Or...better yet, some Skittles?

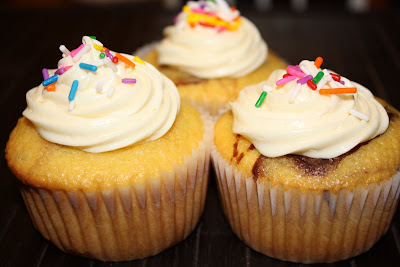
Personally, I prefer a little less icing with some good old fashioned sprinkles...
and more sprinkles!
But others prefer simplicity...
Enjoy!

A few weeks ago, I attended a Cupcake Class where Pastry Chef Melissa Abbou shared some delicious recipes for buttercream icing.

Vanilla Buttercream Icing
3/4 cup unsalted butter (room temperature)
4 cups icing sugar
1/3 cup milk
2 tsp vanilla


Cream butter scraping down sides of bowl. At slow speed, alternate adding icing sugar and milk. Add vanilla and the last bit of icing sugar. Whip together. If wanting to color the icing, or add raspberries, add now.
*For dairy allergies, soy milk can be substituted for milk, and margarine for butter.

Don't worry...I didn't forget about you chocolate lovers!

Chocolate Buttercream Icing
3/4 cup unsalted butter (room temperature)
2 1/2 cups icing sugar
1 1/2 cups cocoa powder
1/3 cup milk

Follow same steps as above. Enjoy!

Sunday, November 8, 2009

Personalized Cookies for Zoe's Birthday

Yay! I got my first order! My friend Mary ordered personalized cookies for her daughter Zoe's 7th birthday! Knowing that I am allergic to nuts and that all of my baking is nut free, Mary knew that individually wrapped cookies would be a "sweet treat" for Zoe to bring to school to help celebrate her birthday with her classmates.

I started off by following all of the same steps I used when I made Decorated Sugar Cookies. This time, I filled Wilton Squeeze bottles with icing instead of using ziplock bags. I found the bottles to be a very effective tool. After squeezing out of all the icing, I let the cookies set overnight.


Mary gave me a list of Zoe's classmates so that I could personalize each cookie.

She requested this color combination. I just love it! Instead of using food colouring to add colour to the white icing, I used Wilton Icing Colors in teal and violet from Bulk Barn. The bottles are about 1 ounce and will last for a very long time. I used a toothpick to add as much color as I needed to the icing. To make the icing darker, add more color.

Happy Birthday Zoe!
All packed up and ready to go!

Tuesday, November 3, 2009

Cookies for the Newly Engaged Couple

From the day Rich proposed, I knew that I wanted to make "wedding cookies." They were the perfect treat to serve at a "Toast" that our parents threw for us over the weekend. I was inspired by many of the ideas that I read in my favourite cookie book called Cookie Craft, by Peterson and Fryer. The only challenging part....finding the cutters.

Eventually, after searching in many stores, I found a "Wedding Cookie Cutter Set" at Michaels. I also purchased a "bridesmaid dress" cutter, (definitely my favourite one, left in the photo below) from the Retail Store at The Bonnie Gordon School of Cake Design . I am still on the hunt for a tuxedo or a suit cookie cutter...if you have any suggestions of where I can find one, please let me know!


I like to add lemon rind to my sugar cookie recipe to give them a little zing!

Have fun cutting away!
Be sure to evenly space out each cookie on a cookie sheet lined with parchment paper.

Bake for 12 minutes and let cool on a cooling rack.

Pipe royal icing to outline each cookie. This icing is a thicker consistency which creates a border so that the thinner, royal icing for flooding will not drip off of the cookie.

Flood and let set overnight.
Decorate if you like.
Da, da, da ,da...
Here comes the bride!
For the bridesmaid dress cookies, I added pink food colouring to the icing. I intentionally made the color of the icing for piping a little darker than the color of the icing for flooding.

These cookies turned out so well!

First....Pipe.
Then...flood.

The next day, I decorated them with sugar and more icing!
Aren't they adorable?

Just lovely!


In fact...I was so thrilled with the way that the bridesmaid dress cookies turned out, that I decided to personalize them with the names of my friends whom I wanted to ask to be my bridesmaids. I only personalized the names of those whom I knew would be attending the toast. I asked each of my friends individually, to march for me by presenting them with a cookie.


My sister and brother caught some of their responses...

JUST PRICELESS!


And that about sums up the first celebration of this fabulous time in my life.

I hope that you enjoyed the cookie ideas.
I'm off to eat a leftover cookie!