Search This Blog

Monday, July 27, 2009

Birthday "Heartcakes" and Cupcakes

Just look at the excitement on my face!


What a surprise I was faced with when my girlfriend Sarah brought "Heartcakes" (that she made and decorated herself) to a restaurant especially for me on my birthday!


She even decorated them with different colour icing and sprinkles! And, made chocolate, vanilla and marble cakes!


Happy Birthday to me!!!


I love you Sarah! You made my birthday very special! YUMMY!!!


It got even sweeter when my brother's girlfriend Kelly baked me a

CARROT CUPCAKE CAKE!!!


DELICIOUS!!! Thanks Kel!


And for my grandmother's birthday, I baked chocolate fudge cupcakes with sweet icing!


Kickin' it old school with my aunt's hand blender from the 80's! It still works!


Fill muffin tins just over half way. Bake at 350 for about 25 minutes.


Let cool and decorate!


The swirl is my favourite.

Fill a piping bag with one colour icing on one side, and the other colour icing on the other side.

It looks so pretty!


Saturday, July 25, 2009

Blueberry Cornmeal Pancakes Anyone???


Yummy!!! This is one of the very few times I dared to make my own homemade pancakes...
Rich doesn't even love pancakes...but he said that these ones were worth the wait!
This recipe is taken from my admirer at the moment, Bakerella. She took it from the June Issue of Martha Stewart Living.

Not only am I trying to bake as well as Bakerella does, but I am trying to make some of the recipes that she has made over the past few months and trying to take pictures from the same angles as she does.
Here is the recipe that I halved and tweaked a bit, to make just enough pancakes for two! I also do not own a griddle so I used a small frying pan. It took more time to make each one separately, but it worked out well!

Blueberry Cornmeal Pancakes
1/2 cup flour
1/4 cup cornmeal
1/8 cup sugar, plus 1 tsp for blueberries
3/4 tsp baking powder
1/2 tsp salt
1/4 tsp baking soda
3/4 cup milk
1/4 cup cream
1 egg
1 cup fresh blueberries
Combine dry ingredients in a bowl and whisk together. In another bowl, combine wet ingredients and whisk together. Add wet ingredients to dry ingredients. In a separate small bowl, toss blueberries in 1 tsp. of sugar.

Pour batter into frying pan, 1/4 cup at a time. At first, I added a small brick of butter, but after the first pancake it is not necessary to add any more butter. The pancakes turn out better as you continue to make each one! Add blueberries. Let cook for about 2-3 minutes. Flip onto other side for 1-2 minutes. Continue and enjoy!

Makes about 8 pancakes.

TIP:

Since I used a small pan and only made one pancake at a time, I immediately put the finished pancakes in the oven to keep warm until the remaining pancakes were ready!


Tossed blueberries in sugar...yummy!

Add in blueberries as the first side of the pancake is cooking...when the pancake is filled with bubbles....it is ready to be flipped!


Here's what it looks like on the flip side!


Don't forget to add some maple syrup!


Who wants the last bite?

Enjoy!

Wednesday, July 22, 2009

Spritz Cookies and The Cookie Press


I finally figured out how to use my cookie press! A cookie press is another tool used to form cookies through a tube and a selected disk, as opposed to rolling out dough and using a cookie cutter to cut out the desired shape. Whichever method you choose is up to you.

My friend Shirel invited me over to teach her how to use her cookie press since I recently bought mine and finally figured out how to properly use it! I bought mine through The Pampered Chef, and the one my girlfriend had at her place was from Michael's.

The recipe we used (above) came with Shirel's Cookie Press called Cookie Max. It is a basic Spritz Cookie Recipe. (Always close your eyes when adding the butter!)

Pictured above are most of the ingredients we used to make the Spritz Cookies.

Don't you just love sugar and butter?!

The cookie press makes each cookie turn out equal in size and creates a nice design.


A few coloured sprinkles for an added touch!

Thanks to Shirel's kids who helped decorate!

TIPS: We learned a lot about using the press....

-Put the baking trays in the freezer to chill about 5-10 minutes before baking. This provides a similar surface as a cold stone.

-Place cookie press at a 90 degree angle so that the lip of it, is like a suction on the cookie sheet. This will allow you to squeeze the trigger and hear two clicks as the dough forms into the shape of the chosen cookie.
-Use parchment paper or wax paper to keep cookies in one piece when transferring from cookie sheet to a plate or a container.

Tuesday, July 21, 2009

Cupcakes, Cookies and Cake

I browsed through my photos over the past few years and have found some pics of cupcakes and other sweet treats that I created!

I baked and decorated these multi-coloured cupcakes for a Luved Clothing Party I had at my place. No one wanted to eat them because they looked so yummy. I had to send everyone home with one and my students sure did enjoy the remaining cupcakes the next day!

Love the swirl icing!
I made the cupcakes with purple icing below for my friend Sherri's Bridal Shower. They were a "sweet" hit!

My grandmother turned 92 last February. For dessert, I baked pink cupcakes and matching heart sugar cookies!
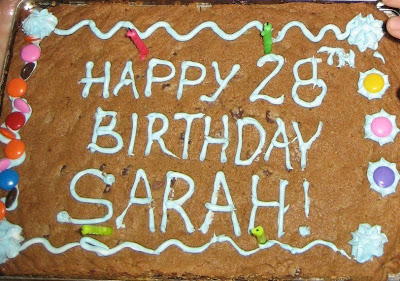
Can you believe that my friend Sarah made me edit her out of her own birthday picture with her Gigantic Chocolate Chip Birthday Cookie!?!
This is one of the most creative cakes that have made yet! I actually painted on the coloured icing! My favourite part of the cake are the coloured sprinkles!
Go Canadiens!

Chocolate Chip Cookies


Rich loves chocolate chip cookies and he recently discovered Ghiardelli Triple Chocolate Chip Cookie Mix. Okay...it is a good mix, however, these chocolate chip cookies are just as good, if not better! And...they are made from scratch!
I should thank my cousin Naomi who sent me a link to an awesome website of recipes. Bakerella makes Cupcake Pops (cupcake lollipops dipped in chocolate) and she also documents her baking. I guess it was her Blog that inspired me to begin my own! I took this recipe from her site and also learned some great tips from her, as well as from my own experience baking these cookies.
I used 1/2 tablespoon to measure the dough for each cookie so that each cookie would be the same size. After I baked a few batches, I learned that if you like a lumpy, thicker cookie, you can scoop each 1/2 tablespoon of dough onto the sheet lined with parchment paper as pictured above.

After the third batch, I realized that to achieve a smooth, thinner cookie, I needed to roll the dough into a ball and flatten it on the cookie sheet prior to baking. Below you can see the smoother finish as the cookies baked in the oven.


I buy my chocolate chips at Costco...the ChipitsMega Pack (a huge bag) for about $8.99...it's way cheaper than buying the small bags at the grocery store. And, to make the cookies even more chocolatey add some chocolate chips to the top of each cookie half way through baking as pictured below. (Thanks Bakerella for the tip!)


Love this shot below of the cookies reflecting in the bowl!


MMMMmmmmm....Delicious, hot, soft and chewy chocolate chip cookies!

I am getting better with the angles as I take more pics!

The first three people who post a comment about my newly created blog and mention the packages of chocolate chip cookies pictured below, will have a package delivered to their house tomorrow!!!!
They really are delicious!!!

For all of you who did not win the contest, but want to make your own cookies, here is Bakerella's recipe that I have now adopted!
Chocolate Chip Cookies
2 1/4 cup all-purpose flour
1 tsp baking soda
1/2 tsp salt
1 cup butter, room temperature
1 cup brown sugar
1/2 cup sugar
2 eggs
2 tsp vanilla
2 cups chocolate chips
Preheat oven to 350 degrees.
In a bowl, mix flour, baking soda and salt with a wire whisk and set aside.
With a mixer, beat butter and both sugars until well blended.
Beat in eggs and vanilla.
Add flour mixture in two additions until combined.
Stir in 1 1/2 cups chocolate chips.
Use a mini ice cream scoop or a 1/2 tablespoon to drop cookie dough on a parchment covered cookie sheet about 2 inches apart.
Bake for 8-10 minutes.
Tip: About half way through baking, sprinkle reserved chips on top of cookies. This is just to make them prettier so, some of the chips are seen on top.
Makes 2-3 dozen

Saturday, July 18, 2009

Ice-Cream Cone Cupcakes

This is so exciting! A place where I can share my baking ideas, talk about what I have learned while baking, and post some of my latest creations as I bake throughout the summer!

It all started off with a gift that I received from one of my students at the end of June.
Martha Stewart's CUPCAKES is the name of the book. As I was browsing through it, I was immediately drawn to pages 198-199...Ice-Cream Cone Cupcakes.

Since I am new at this blogging thing, I realize in retrospect, that I should have taken pictures throughout the process, as I only took pictures at the end. Nevertheless, I can still talk about all of the fun that occurred as I attempted to make Ice-Cream Cone Cupcakes for the first time!

I followed the recipe and assembled the cones in the tube pan with a double layer of heavy duty foil as pictured below. I then filled each cone with about 2 tablespoons of batter, set the pan in the oven and checked it about half way through. Oh my goodness! A majority of the batter looked like it had exploded above the cones onto the foil! Luckily I caught it in time!

My Ice-cream cone cupcake surgery had begun! I removed each cone individually, and with a spoon, made sure that each cone only had in it about 1 tablespoon of batter! Just as I was about ready to give up, I re-foiled the tube pan and baked the cupcakes for another 12 minutes, and I am glad that I did!


It all worked out! Here is the result!

My favourite is the soft-serve "twist" cone in the middle where I filled a piping bag with vanilla and chocolate icing side by side. I guess I put a little more vanilla than chocolate...Whoops!

I decided to cover up some of the "overflow" by decorating the outside of the cones! Above, I used chocolate icing to "glue" on smarties. And below, I used chocolate icing and rolled the cone in sprinkles before I added the "strawberry ice cream!" For the "ice cream" I used a piping bag with pink icing.

And that concludes my first Sweet Treat update!