Search This Blog

Sunday, January 24, 2010

Cookies for Rowan's First Birthday!

My girlfriend Joelle's son celebrated his first birthday last week!  I was very excited when she ordered cookies to serve at his birthday party, and others to include as part of the loot bags for the kids.
I bought two Wilton decorating squeeze bottles that I used to flood each cookie. Then I used a toothpick to fill in all of the points of the stars.
 
Mmm..don't you just want to take a bite?!
I personalized the cookies free hand using a Ziploc bag without a tip. I seem to have more control that way.
All packed up and ready to be delivered!
Happy 1st Birthday Rowan!

Sunday, January 17, 2010

Happy 30th Girls!

It's hard to believe it, but it is very true!  All of my friends and I are in our 30th year!  To celebrate Lauren's, Joelle's and Jen's birthdays, we had a girls night out, and I baked a cake for dessert.

Preparing the Fondant:
To make the fondant letters I used on the cake, I first added gum paste to the fondant.  I learned how to do this a few months ago at the cupcake course I took at The Bonnie Gordon School of Baking.
Add desired color and work into fondant well.  Since food colouring stains, it is a good idea to wear gloves. Continue to work colouring into fondant until desired colour is reached. 
Fondant dries quickly. Storing remaining fondant in Ziploc bags, even while working with it, reduces the chances that it will harden. This is important to help maintain its freshness.

Set aside prepared fondant in bags. 

Baking and Decorating the Cake:
Prepare your favourite cake.  Divide batter into two 9-inch baking pans. I made a marble cake and used a knife to create a swirl throughout.  Bake at 350 degrees for about 30 minutes. Let cool.
Mix food colouring into icing.  Pour about 1/4 cup of icing onto first cake.  Spread evenly and place second cake on top.  Pour remaining icing overtop. (About 1 cup.)
Using an offset spatula, spread the icing across the top, pushing the excess icing down onto the sides of the cake.  Cover entire cake and sides. Smooth the top of the cake or create desired texture.

Cutting Out and Placing Letters on the Cake:
I was so excited to use my newest cookie cutters to cut out the fondant letters.

Using a rolling pin, roll out fondant on a piece of
wax paper until it is about the thickness of a dime.
Cut out letters using cutters.
Use spatula to lift letters from wax paper.


Carefully place letters onto cake. 
The icing acts as a glue to secure each letter to the cake. 

Celebrate!
Go out for dinner and drinks with your closest girl friends...

Schmooze, eat, drink, laugh, smile...

Sing Happy Birthday...
Blow out the candles and make a wish...
Happy 30th Girls!

Saturday, January 9, 2010

Easy Cottage Cheese Pie

Ya...not as easy as my Aunt had suggested...but, it still tasted good!  It was my first time making a pie!  I am so used to letting butter soften overnight to make cookies, that I didn't realize that butter used for pie crust is supposed to be cold. A lesson learned for next time. This didn't affect the flavour of the delicious crust...just the appearance!  Instead of a nice jagged edge, as I had planned for, I ended up with a two inch wide crust.

Ingredients you will need for this recipe:

Topping:
1/2 c. cornflake crumbs or bread crumbs
1 tbsp. sugar
1/4 tsp. cinnamon

Dough:
1/2 c. butter cut in chunks
1/2 c. sugar
1 egg
1 tsp. vanilla
1 1/2 c. flour
1/2 tsp. baking powder
1/4 tsp. salt
2 tbsp. sour cream

Filling:
1 lb. dry cottage cheese
2 eggs
1/4 c. sugar
2 tsp. sour cream
dash of salt
1 tsp lemon juice

Topping:
In Food Processor use steel knife to combine ingredients for topping.  Process until fine and set aside. Rinse bowl. 

Dough:
Process butter, sugar, egg and vanilla for 2 minutes scraping down the sides of bowl once or twice. 
Add remaining ingredients for dough.  Pulse, just until mixed.  Spread dough into bottom and up sides of greased 9'' pie plate with rubber spatula.  (I refrigerated the dough as I went on to prepare the filling.) Wash and dry bowl and blade.

This was the first time I made my own crust. It looked so good before I put it into the oven.


Filling:
Combine all filling ingredients in processor bowl. 


Process until blended. Spread evenly over dough.

Sprinkle with topping.

Bake at 350 degrees for about 45 minutes.
Serve with sour cream and berries. 
Yield 6 servings. 

I actually prefer to eat this pie cold.  It is delicious!   Let sit for about 2 hours and refrigerate overnight.


Enjoy!

Sunday, January 3, 2010

Cheesecake


Happy New Year!
What a perfect opportunity to try out a new recipe using the gift I received from my Secret Santa! Thanks Mary! 
In fact, I didn't use the exact recipe found on page 60 of Sweet Cakes 2009 from Fine Cooking Magazine.  I modified it from a Triple Chocolate Cheesecake to a New York Style Cheesecake.  Silly me....only now as I am referring back through the magazine did I notice two other recipes for regular cheesecake! 

This was the first time I used sour cream when making cheesecake.  It makes for a much creamier cake.  Very delicious if I may say so myself! 

Ingredients you will need: (Modified from Fine Cooking Holiday Baking Issue)

For the Crust
1 1/2 cups graham cookie crumbs
3 tbsp. granulated sugar
4 tbsp. unsalted butter melted

For the Filling
1/2 cup sour cream
2 tsp. vanilla extract
3 8oz. packages cream cheese at room temperature
1/4 tsp. table salt
1 1/4 cups granulated sugar
3 large eggs, at room temperature

Make the Crust
Heat oven to 400 degrees.  In a medium bowl, stir together the graham cracker crumbs and sugar until blended.  Drizzle with melted butter and mix until well blended and the crumbs are evenly moist.  Dump the mixture into a 9 inch spring form pan and press evenly onto the bottom and about 1 inch up the sides of the pan. (I used a coffee mug to push the mixture against the walls of the pan.) Bake for 10 minutes and set on a wire rack to cool.  Reduce oven temperature to 300 degrees. 

Mix the Filling and Bake
Mix the sour cream and vanilla in a small bowl and let set. In a stand mixer fitted with the paddle attachment, beat the cream cheese and salt until very smooth and fluffy, scraping down the sides of the bowl and paddle frequently.  Add the sugar and continue beating until well blended and smooth. 
Beat in the sour cream mixture until well blended.  Add the eggs, one at a time, and beat until just blended.  Don't overbeat, or the cheesecake will puff up too much. Pour the filling over the cooled crust, spread evenly and smooth the top. 
Bake at 300 degrees until the center barely jiggles when nudged, about 50-60 minutes.  Let cool to room temperature and then refrigerate until well chilled, at least a few hours or overnight for the best texture and flavour.  To serve, unclasp the pan's ring, remove it and run a long thin metal spatula under the bottom crust.  Carefully slide the cake onto a flat serving plate.  Garnish with whip cream and berries.
Bring to a friend's for New Years or for any occasion!
Enjoy every last bite!
Happy New Year!

Saturday, January 2, 2010

Ghirardelli Square

I was so excited to stumble upon Ghirardelli Square while visiting our friends Sarah and Joel in San Francisco last week!  I had no clue that San Francisco was known for Ghirardelli Chocolate, and that a Ghirardelli Chocolate Store is located at the corner of nearly every street and in every terminal in the airport.

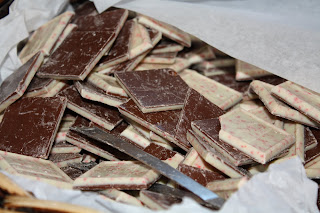
Part of Ghirardelli's holiday promotion included baskets filled with their peppermint bark handed out for free to anyone walking into their stores. Needless to say...I think I might have eaten one each day!  Don't you just love the holidays?
Ghirardelli Square includes three different Ghirardelli stores including an Ice Cream Shoppe that featured the machines and steps involved in the Chocolate Making Process. I wanted to jump into the melted chocolate and go swimming!  Read below for all four steps.

Chocolate Lovers....this is for you!

Step 1

Step 2

Step 3-Yes that is all chocolate!

Step 4-And so is that!
Look what Sarah bought me?!  The Ghirardelli Chocolate Cookbook.  For all of you who were shocked when I made Ghirardelli Chocolate Chip Cookies from a mix...I have now redeemed myself!  I used the recipe from the bible, and made Rich the real deal! See below for the recipe! 
Key to these cookies...using Ghirardelli milk chocolate chips.
Think smart!  Make an extra batch and save in the freezer for later. 
It fills the house with such a wonderful aroma when guests are over!
Then, defrost and pop in the oven at 375 for 8-9 minutes.
Enjoy!