Search This Blog

Sunday, December 25, 2011

Chanukah Desserts Part 1-Homemade Souvganiot

Happy Chanukah! The first night of Chanukah was on Tuesday night.  On Monday night, I received a personal lesson by a former student's mom who is from Israel. She taught me how to make homemade souvganiot!  Souvganiot is the hebrew work for jelly doughnuts. Jelly doughnuts are a traditional treat for the Chanukah dessert table, since on Chanukah, it is a tradition to fry all foods in oil to remember the oil that burned in the temple for 8 days.

 
If you want to make your own souvganiot for Chanukah, here are the ingredients you will need:
2 1/2 cups flour
2 eggs
1/4 cup sugar
1 1/4 cups plain yogurt
2 tsp vanilla extract
1/2 tsp lemon juice
3/4 tbsp baking powder
vegetable oil for cooking
strawberry jam
icing sugar

Below are the utensils/items you will need:
-a large mixing bowl
-towel
-stand mixer
-two spoons
-tall pot
-candy thermometer
-squeeze bottle
-sifter/metal strainer
-paper towel
-cookie sheet

 
Combine all ingredients into the bowl of a stand mixed attached with the paddle attachment. Mix all ingredients until just combined and dough has formed. Cover with a towel and set aside for about 15 minutes.

Fill a pot about one and a half inches high with vegetable oil. Turn on the burner just past medium, until the heat reaches between 350-360 degrees. This temperature will  create the perfect golden brown coloured doughnuts.

Using two spoons, spoon out the dough from the mixing bowl, forming a round ball.  Drop the dough into the hot oil and watch it sizzle!


Once the first side reaches the perfect golden brown color, flip the doughnuts over to cook the opposite side. (About 4 minutes per side.)

Test a few doughnuts initially by cutting them in half to see if the insides are completely cooked through.  This doughnut was not ready.  As you can see, it was still raw inside.

Once removed from the hot oil, set on a cookie sheet lined with layers of paper towel. This will absorb some of the oil. Use a knife to poke holes in each doughnut.  This will make it easier to fill the doughnuts with strawberry jam.

Stick the nose of the squeeze bottle directly inside the hole of the doughnut. Squeeze a fair amount of strawberry jam into each doughnut allowing a dollop to show on the outside of the doughnuts.


Garnish with icing sugar.
Arrange on a plate and enjoy!

Sunday, December 4, 2011

Cake Pop Bouquets for my Sister's Engagement Party

My sister, my mom and I had a blast creating the "edible centerpieces" for my sister's engagement party a few weeks ago.  They were original, creative and delicious! 
To make these centerpieces here are the items you will need:
-all of the ingredients to make basic cake pops
-a mix of longer and shorter lollipop sticks
-Fiskars X-Large Easy Squeeze Punch (The link is similar to the one I bought but not exactly the same.)
-tear drop hole punch (pictured below)
-"Save the Date tags" (that I created myself and so can you!)

-vases of some sort or planter (My sister bought these adorable, purple planters at IKEA)
-styrofoam balls (which I found at Dollarama)
-rocks (also bought at Ikea)

To begin, I created two different "save the date" tags on the computer and printed them at Staples on cardstock. The firmer paper allowed them to slide through the lollipop sticks without ripping. I used my newly purchased scalloped squeeze punch to cut out all of the tags.  This was a lot easier than cutting circles by hand!
I had to make sure that I left enough space above and below the design to punch teardrop holes in order to slide the stick through the tags.

Aren't the tags cute?
My sister just loved them!
I didn't manage to take pictures of the 8 cakes that my mom and sister baked or the huge mess that we made in my mom's kitchen the day after she had a cleaning lady at her house! Nonetheless, the centerpieces turned out very well.  See below for some pictures.
My sister was thrilled that she bought crystal sprinkles to add a little character to the top of the pops. If you choose to do the same, be sure to sprinkle them onto the pops immediately after they are dipped in the candy melts, as the candy melts dry very quickly.

Adrienne very neatly arranged each pop into its place in the planter.  The styrofoam allowed the sticks to set right into place without moving.

Mazel tov Adrienne and David!

Sunday, November 13, 2011

Ryan's in the Kitchen-Caramel Apples Kiddie Style

I love caramel apples and this was a perfect project for Ryan to help me with.

Here are all of the ingredients we used to make this treat.

Ryan loved his job of unwrapping all of the caramels. He did a little, "criss cross applesauce" as he put the wrappers in one bowl and the unwrapped caramels in the other.

Mmmm...Caramels are so delicious even when they are not melted!  To melt them, add 2 tablespoons of cream to a pot on a low heat and mix continuously for about 25 minutes. Eventually, the caramels will be runny like syrup.

In the meanwhile, Ryan prepared the apples by placing the sticks into each apple. We used popsicle sticks that came with the caramels but you could also use rounder, thicker sticks purchased at Michael's or any craft store. Dip the apples one at a time into the pot of melted caramel. Allow excess caramel drip back into the pot. Place directly onto a parchment lined cookie sheet and decorate immediately.

The fun had begun. Ryan chose all of the decorations for his caramel apple: mini m&m's, Oreo cookie crumbs, and some mini chocolate chips.

And carefully decorated his apple. After he was done, I decorated the rest.

Sometimes, simple is best...

But for you chocolate lovers...this apple may be preferred.

Chill apples in the fridge for a minimum of an hour before serving.
Enjoy.

Sunday, October 30, 2011

Pumpkin Cake Pops

Do you ever wonder what to do with leftover cupcakes or cake?  

Use the leftovers to make cake pops! Remove the majority of icing from the cupcakes and place cupcakes into a large bowl.

Crumble up until dough sticks together when rolled into a ball.  If the crumbs do not stick, add a little more icing. Since this icing was orange, the cake balls became orange too...perfect for Halloween!

Form cake balls into desired pumpkin shapes. (I used the side of a spatula to form ridges in some of the cake balls to make them look more like pumpkins.)  Place in the freezer to chill for about 20 minutes.

Boo!!! 
Dip away and add desired toppings.

To make the stems, I moulded small pieces of Tootsie Roll. I crumbled up an Oreo cookie and used random crumbs to make the mouths and piped the eyes with melted chocolate.

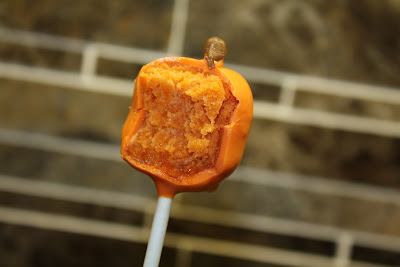
Ever wonder what the inside of a cake pop looks like?  In this case, it is orange, just like the inside of a pumpkin. For a basic cake pop tutorial, click here.

Have a safe and happy Halloween everybody!
p.s. Doesn't my classroom door, decorated by my students look great?!

Sunday, October 23, 2011

Mini Chocolate Cupcakes

Mmm...Doesn't really look like a mini does it?

But it is! I used my brand new Wilton mini muffin pan to make these mini chocolate cupcakes.  They are the perfect snack. When transferring the batter after it has been mixed together, I recommend pouring the it into a piping bag with a sealed tip.  Next, cut the tip of the piping bag and pipe the batter into each muffin liner or pan. This helps to avoid a big mess. (I didn't have a chance to take any pictures as I was piping, but click here for a visual.)

I used these sprinkles to add a little color to the vanilla frosting.

My mother-in-law was visiting from Montreal so I had an assistant this week...

To adorn these perfect, tiny, little cupcakes.
Thanks Kathy!
Two bites and all gone.
Enjoy!

Monday, October 10, 2011

Apple Cranberry Cake

What a fabulous weekend! Was it really October?  Did anyone else spend time enjoying the gorgeous weather?  I couldn't help but peel the apples for my apple cranberry cake outside while enjoying the sun hitting my back as though it were a warm summer day!  (Hence the grass underneath the bowls.)

I was also a little sad when making this cake since my apples came from the grocery store and not an apple farm. Nevertheless, the courtland apples tasted as yummy as ever, and with an addition of fresh cranberries to my apple cake recipe, doubled, this dessert was delicious!
Remember; do not discard of the apple peel!  The nutrients are good for you and apple chips are yummy!  Link to this post and scroll down to learn how to make apple chips.

Another tip...to prevent apples from browning, use the juice of one lemon and immediately roll peeled apples in the juice.

An apple corer or this kitchen aid apple slicer contraption works well to core and cut up the apples.

Once cut, discard of apple cores.

Or, take a picture, and then discard!

Next, pile up all of the apple pieces into the food processor and let it slice away. Follow the recipe from this post to make this cake. Remember, I doubled the recipe for the dough.

Since I doubled the recipe for the dough, I used a 9 x 13 inch dish to make the cake. Spray it with a cooking spray so the cake will slide out easily.

Spread the first batch of the cake mixture PLUS a quarter if the second batch over the surface of the pan. Next, alternately layer the apples and fresh cranberries. I used about half a bag of cranberries. I placed the cranberries on top of the sliced apples by hand. By placing them, they were evenly distributed throughout the cake. Continue to layer apples and cranberries. Pour remaining cake mixture and spread over fruit. Sprinkle with additional sugar and cinnamon if desired.

Bake at 350 for about 50-60 minutes or until golden brown.
I loved the tartness of the cranberries combined with the sweetness of the sugar and cinnamon coated apples.  Mmmm...The aroma created in the house when this cake was baking made my mouth water. And it will when you make it too! Enjoy.